How to Set Up SPF, DKIM and DMARC for an Australian Business Domain
If your business sends email from its own domain, three DNS records do most of the work of proving those messages are genuine: SPF, DKIM and DMARC. Get them right and receiving servers can tell your real mail apart from someone pretending to be you. Get them wrong, or skip them, and your invoices and quotes are more likely to land in spam, while scammers can send convincing fakes from your domain.
This guide walks through all three in the order we recommend, using example.com.au as the domain. Replace it with your own.
What each record does
| Record | What it proves | Where it lives |
|---|---|---|
| SPF | Which servers are allowed to send mail for the domain used in the envelope sender (the "Return-Path") | TXT record on the domain itself |
| DKIM | That the message was signed by a key the domain owner published, and was not altered in transit | TXT (or CNAME) record at selector._domainkey |
| DMARC | What receivers should do when a message fails, and where to send reports. It also requires that SPF or DKIM passes for the domain in the visible From address | TXT record at _dmarc |
The important detail is in the last row. SPF and DKIM on their own only check the domains they are tied to, which may not be the domain your recipient sees. DMARC adds alignment: at least one of them must pass and match the From domain. That is what stops a spammer passing SPF for their own domain while showing yours in the From line.
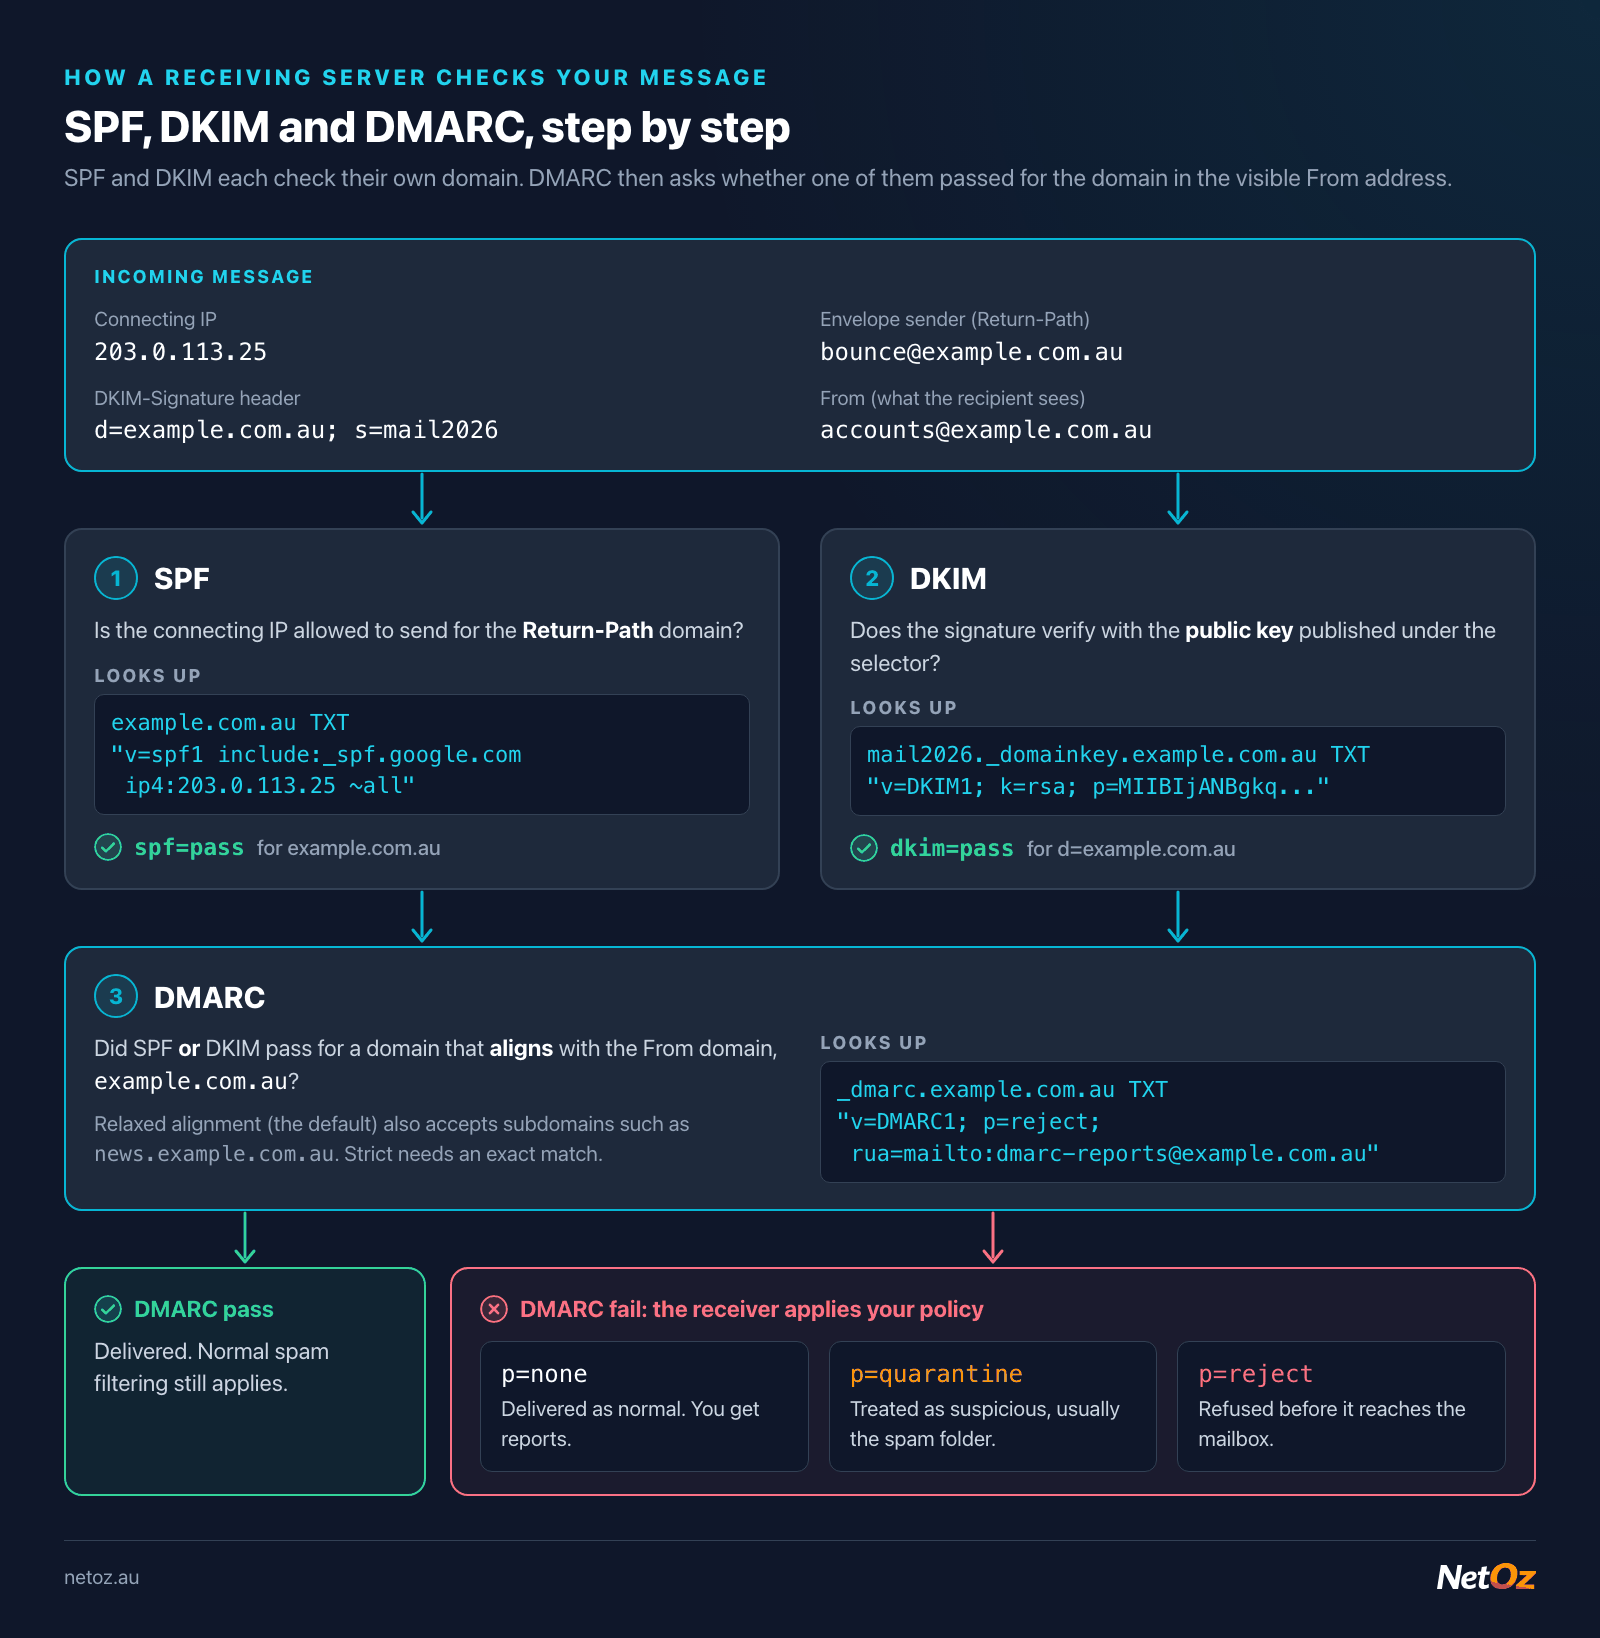
DMARC only passes when SPF or DKIM passes for a domain that aligns with the visible From address.
Step 1: List everything that sends mail as you
Before writing any records, make a list of every system that sends email using your domain. Most businesses have more than they think:
- Your mailbox provider (NetOz Email, Microsoft 365, Google Workspace and so on)
- Your website, for contact form notifications and WooCommerce or shop receipts
- Accounting and invoicing software (Xero, MYOB and similar)
- Your CRM, helpdesk or booking system
- Newsletter and marketing platforms
- Copiers and scanners that "scan to email"
For each one, find its documentation on SPF and DKIM. Most will give you an SPF include: value and either a DKIM record or a way to generate one. This list is the foundation for everything that follows, and anything you miss will show up later as a DMARC failure.
Step 2: Publish SPF
SPF is a single TXT record on the root of your domain. A typical record for a business using one mailbox provider plus a CRM looks like this:
example.com.au. 3600 IN TXT "v=spf1 include:_spf.google.com include:spf.example-crm.com ip4:203.0.113.25 ~all"
Reading it from left to right:
v=spf1identifies the record as SPF.include:pulls in another domain's SPF policy, which is how providers publish their sending ranges._spf.google.comis Google Workspace; Microsoft 365 usesspf.protection.outlook.com.ip4:(andip6:) authorise specific addresses, such as your own web server.~allis a soft fail for everything else.-allis a hard fail.
Rules that catch people out
Only one SPF record per domain. If you publish two TXT records that start with v=spf1, SPF returns a permanent error and effectively fails. When adding a new service, edit the existing record rather than adding another one.
The 10 DNS lookup limit. SPF evaluation may trigger no more than 10 DNS lookups. The mechanisms that count are include, a, mx, ptr, exists and the redirect modifier, including any lookups made inside the records you include. ip4, ip6 and all do not count. Exceed 10 and receivers return a permerror, which DMARC treats as a fail.
Big providers often use several lookups each. A record like this can tip over the limit without looking long:
v=spf1 mx a include:_spf.google.com include:spf.protection.outlook.com include:servers.example-newsletter.com include:mail.example-crm.com ~all
Ways to stay under 10:
- Remove
mxandaunless those hosts really send mail. They are often copied in by habit. - Remove services you no longer use.
- Replace an include with
ip4:ranges only where the provider's addresses are stable and documented. Be careful: if they change, your SPF silently breaks. - Move bulk or marketing mail to a subdomain such as
news.example.com.auwith its own SPF record. - Avoid
ptrentirely. It is deprecated and slow.
Paste your domain into our SPF validator to see the full lookup tree and count. If you are starting fresh, the SPF record builder will assemble a valid record for you.
~all or -all? Once DMARC is enforcing, receivers make the final decision based on DMARC, so ~all is a sensible and common choice. -all is fine if you are confident your list from Step 1 is complete.
Step 3: Turn on DKIM for every sender
DKIM uses a key pair. Your sending system signs each message with a private key, and you publish the public key in DNS under a selector, a label that lets you have several keys at once. The record name is always selector._domainkey.yourdomain:
mail2026._domainkey.example.com.au. 3600 IN TXT "v=DKIM1; k=rsa; p=MIIBIjANBgkqhkiG9w0BAQEFAAOCAQ8AMIIBCgKCAQEA..."
v=DKIM1is the version.k=rsais the key type.p=is the public key itself, usually several hundred characters long.
Practical points:
- Use 2048-bit RSA keys where the provider offers a choice. 1024-bit keys are increasingly seen as weak.
- Long values may need splitting. A single DNS string is limited to 255 characters, so a 2048-bit key is published as several quoted strings in one TXT record. Most DNS control panels handle this for you. If yours does not, the record will look like
"v=DKIM1; k=rsa; p=MIIB..." "...rest of key". - Each sender gets its own selector. Your mailbox provider, newsletter tool and CRM will each have their own. Microsoft 365, for example, asks you to publish CNAME records for
selector1andselector2that point to keys it manages and rotates. - Copy the value exactly. A single missing character breaks the signature check.
If your email is hosted with NetOz, follow Set up DKIM email signing for your domain. It shows where to enable signing and how to copy the record. As that article notes, only turn signing on when you are ready to publish the record.
To confirm DKIM is working, send a message to an external mailbox, open the original message source and look for dkim=pass in the Authentication-Results header. You can paste the headers into our email header analyser to read them more easily.
Step 4: Publish DMARC in monitoring mode
DMARC is a TXT record at _dmarc.yourdomain. Start with a policy of none, which changes nothing about delivery but tells receivers to send you reports:
_dmarc.example.com.au. 3600 IN TXT "v=DMARC1; p=none; rua=mailto:dmarc-reports@example.com.au; fo=1"
The tags you will use most:
| Tag | Meaning |
|---|---|
v=DMARC1 | Required, and must come first |
p= | Policy for the domain: none, quarantine or reject |
sp= | Policy for subdomains. Defaults to the value of p if not set |
rua= | Where to send daily aggregate reports (XML) |
ruf= | Where to send failure reports. Many large receivers do not send these, for privacy reasons |
adkim= / aspf= | Alignment mode for DKIM and SPF: r (relaxed, the default, allows subdomains) or s (strict, exact match) |
pct= | Percentage of failing mail the policy applies to |
fo=1 | Ask for failure reports if either SPF or DKIM fails, not just both |
A few notes:
- Use a dedicated reporting mailbox. Aggregate reports arrive as zipped XML files, sometimes many per day. A DMARC reporting service, or a parser you run yourself, makes them readable.
- Reports sent to another domain need permission. If your
ruaaddress is at a different domain (for example a reporting service), that domain must publish a record such asexample.com.au._report._dmarc.reportservice.examplewith the valuev=DMARC1. Reputable reporting services set this up for you. pctmay change. The revised DMARC specification that has been working its way through the IETF (often called DMARCbis) replacespctwith a simpler test flag. Major receivers still understandpctat the time of writing, but check current guidance if you rely on it.
Step 5: Read the reports and fix the gaps
Leave p=none running for at least two to four weeks, longer if you send infrequent mail such as end-of-month statements or annual renewals. In the reports, look at each source IP and ask:
- Is this a service we use? If yes, and it fails, add its SPF include or set up DKIM for it. Aim for DKIM pass with alignment on every legitimate source, because DKIM survives forwarding and SPF often does not.
- Is it a forwarder or mailing list? Some failures come from legitimate forwarding. These usually still pass DKIM unless the message was modified.
- Is it someone we do not recognise? That is likely spoofing, which is exactly what DMARC will block.
Our mail server check is a quick way to confirm your SPF lookup count, DKIM and DMARC records are all published and valid while you work through this.
Step 6: Move to quarantine, then reject
When the reports show your legitimate mail passing consistently, tighten the policy in stages:
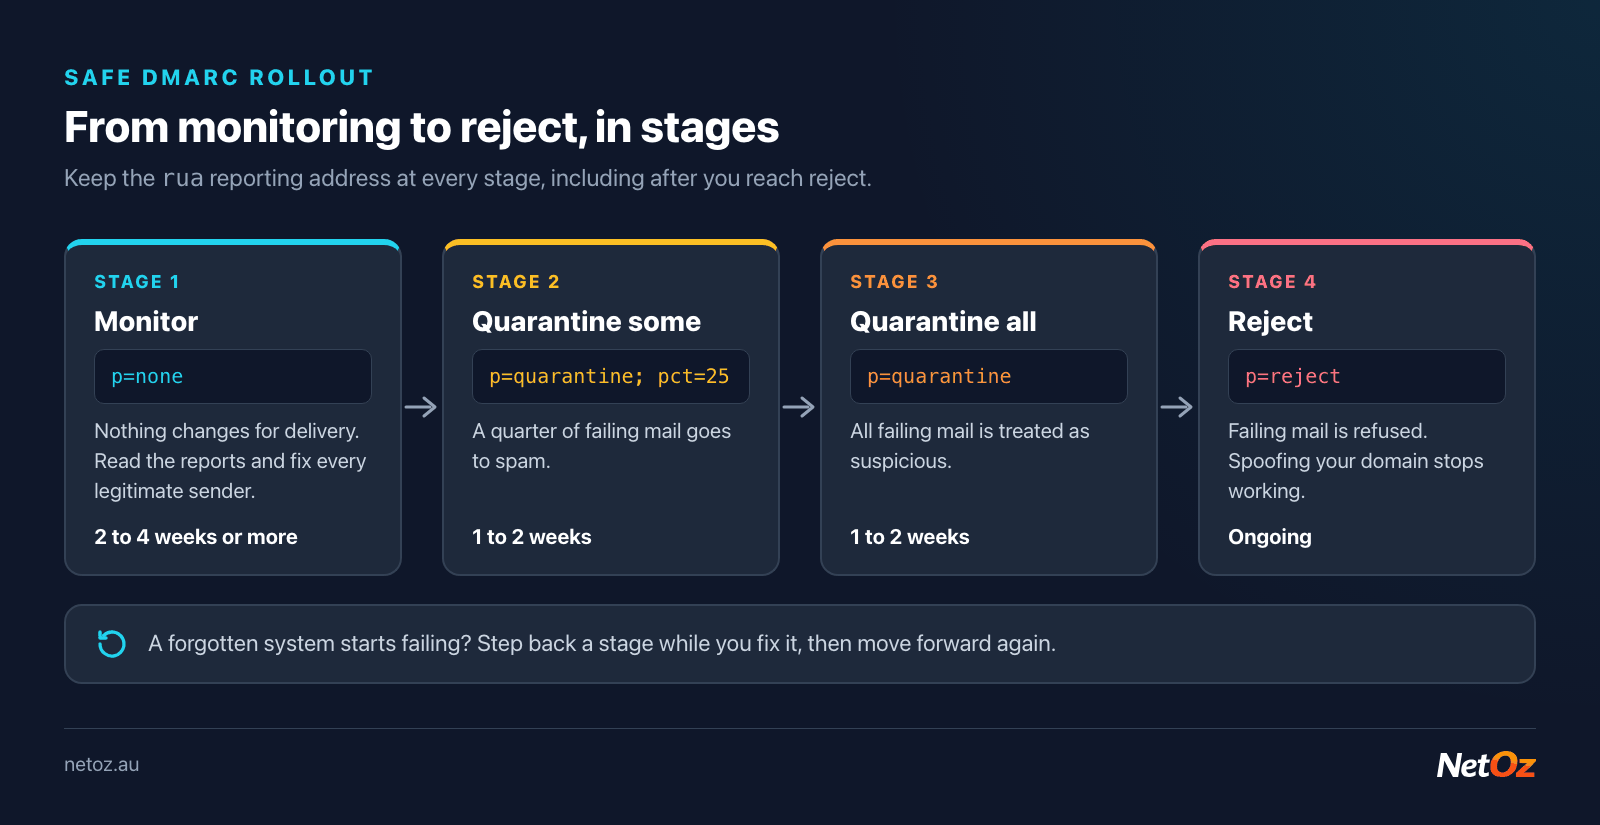
; Stage 2: quarantine a portion of failing mail
_dmarc.example.com.au.  TXT  "v=DMARC1; p=quarantine; pct=25; rua=mailto:dmarc-reports@example.com.au; fo=1"

; Stage 3: quarantine all failing mail
_dmarc.example.com.au.  TXT  "v=DMARC1; p=quarantine; rua=mailto:dmarc-reports@example.com.au; fo=1"

; Stage 4: reject failing mail
_dmarc.example.com.au.  TXT  "v=DMARC1; p=reject; rua=mailto:dmarc-reports@example.com.au; fo=1"
Give each stage a week or two and keep reading the reports. If a forgotten system starts failing, you will see it in the reports and in complaints from colleagues, and you can step back while you fix it. Do not remove the rua tag once you reach reject. Reports remain your early warning if a new service is added without anyone telling IT.
Protect domains that never send email
Many businesses own extra domains: the .com version of their .com.au, old brand names, or campaign domains. If they never send mail, lock them down so they cannot be spoofed:
example.net.au.          TXT  "v=spf1 -all"
_dmarc.example.net.au.   TXT  "v=DMARC1; p=reject;"
example.net.au.          MX   0 .
The last line is a "null MX" record, which tells other servers the domain does not accept email.
Quick checklist
- Every sending service listed
- One SPF record, 10 lookups or fewer
- DKIM enabled for each sender, ideally 2048-bit
- DMARC at
p=nonewith a workingruamailbox - Reports reviewed for two to four weeks or more
- Staged move to
quarantineand thenreject - Non-sending domains locked down
Need a hand?
If you would like this handled for you, NetOz email hosting is $2 per user per month and includes DKIM signing, and our DNS hosting lets you manage SPF, DKIM and DMARC records in one place. Our Adelaide team is also happy to look over your records if something is not passing: get in touch.
Need a hand with hosting or networking?
NetOz provides VM, managed and email hosting, DNS and colocation from a NextDC Tier IV facility in Adelaide.